Category: Packing & Luggage

  • Top 5 Best Travel Pillow Blanket Sets 2025

    We all know the struggle: getting comfortable on a plane, train, or bus can feel like an Olympic sport. Stiff necks, aching shoulders, and a general sense of discomfort are the unfortunate hallmarks of travel. But what if we told you there’s a way to transform your travel experience into one of blissful relaxation? Enter the travel pillow blanket set – your new secret weapon for conquering long journeys in style and comfort. From plush microfiber to innovative memory foam designs, we’ve rounded up the top 5 best travel pillow blanket sets to help you say goodbye to travel woes and hello to sweet dreams, wherever your adventures take you.

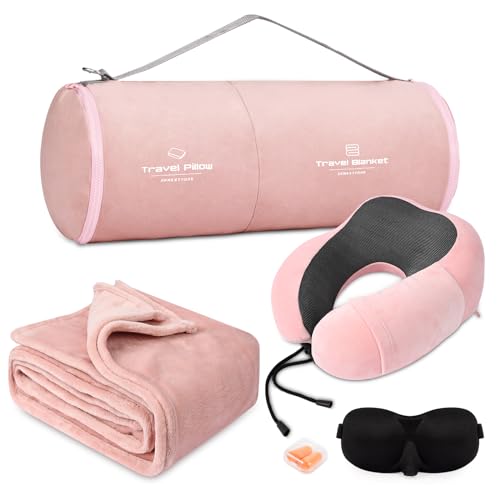
    5. Travellow Travel Pillow and Blanket Set – 4-in-1

    Travellow Travel Pillow and Blanket Set - 4-in-1 Ultimate Travel Kit with Memory Foam Pillow, Travel Blanket, Sleep Mask, and Earplugs-Ultimate Comfort and Coziness for Your Journeys - Grey
    The Travellow Travel Pillow and Blanket Set, while highly ranked, isn’t without its nuances. It boasts a “4-in-1″ configuration, including a memory foam pillow, a generously sized micro plush blanket (65×50”), and travel essentials like a sleep mask and earplugs. The compression case, though innovative, can be a bit tricky to master, requiring some fiddling to achieve the desired balance between pillow and blanket.

    The blanket itself is indeed larger than many others on the market, offering ample coverage for both adults and children. It’s soft and surprisingly warm, making it a welcome companion for chilly flights or car rides. The built-in luggage sleeve and carabiner clip are thoughtful additions, allowing for convenient attachment and keeping everything organized. However, the pocket, while present, is quite small and struggles to accommodate larger items like phones or electronic devices.

    The memory foam pillow, while comfortable, lacks the contoured support of more specialized travel pillows. It’s best suited for those who prefer a simple, plush pillow rather than a more structured neck support. The earplugs and sleep mask included are decent quality, but not exceptional.

    Overall, the Travellow Travel Pillow and Blanket Set offers a good balance of features and functionality. It’s a solid choice for travelers seeking a compact and versatile travel companion. However, those who prioritize dedicated neck support or ample storage space might want to consider other options. The value for money is decent, but it’s not the most luxurious or feature-packed travel kit available.

    Check Price on Amazon

    4. Nenolix 3 in 1 Travel Blanket Pillow Set – 350 GSM

    Nenolix 3 in 1 Travel Blanket Pillow Set - 350 GSM Thick Travel Blanket Airplane Compact with Bag, Soft Bag with a Pocket, Inflatable Travel Pillow for Camping & Car Trip (Dark Grey)
    The Nenolix 3 in 1 Travel Blanket Pillow Set is marketed as a convenient all-in-one solution for travelers, and it does offer some appealing features. The blanket itself is surprisingly thick and comfortable, made from a soft 350 GSM flannel fabric. It’s big enough to wrap yourself up comfortably on an airplane or in a car, and it folds down compactly into the included carry bag. Speaking of the bag, it’s well-designed with a zippered pocket for storing essentials like your phone or passport, and the dual zipper feature doubles as a hand warmer, a thoughtful touch for chilly travels.

    The inflatable pillow is a nice addition, providing extra neck support during long journeys. It’s easy to inflate by simply blowing into the air tube, and it holds its shape surprisingly well. While it’s comfortable enough, it’s not the most robust pillow I’ve encountered. It might not provide adequate support for heavier individuals or those with specific neck issues.

    The set is overall a decent value for the price, offering functionality and comfort for travelers. However, there are a few minor drawbacks. The blanket, while warm, isn’t the most breathable fabric, which could be an issue for those who tend to get warm easily. Additionally, the carry bag, while functional, feels a bit flimsy and could benefit from being made from a more durable material.

    Overall, the Nenolix 3 in 1 Travel Blanket Pillow Set is a practical and affordable travel companion. It’s a solid choice for budget-conscious travelers who prioritize comfort and convenience. Just be aware of the potential limitations in terms of breathability and pillow firmness.

    Check Price on Amazon

    3. Nenolix Travel Blanket Airplane 3 in 1

    Nenolix Travel Blanket Airplane Compact with Bag, Travel Essentials 3 in 1 Packable Airplane Blanket, Travel Pillow and Blanket Set, Inflatable Pillow, Luggage Sleeve & Backpack Clip (Light Grey)
    The Nenolix Travel Blanket Airplane Compact is a 3-in-1 travel essential set that aims to provide comfort on the go. It includes a fleece blanket, an inflatable pillow, and a handy carry bag. The blanket itself is made from a soft flannel fabric, which feels comfortable against the skin. It’s generously sized at 65”x40”, making it suitable for snuggling up on airplanes, in cars, or even at home on the couch. The 280gsm thickness adds a decent level of warmth, although it might not be sufficient for extremely cold environments.

    One of the biggest selling points of this set is its portability. The blanket folds down compactly and fits easily into the included carry bag, which measures 13 * 11 inches. The bag itself is lightweight and has a luggage sleeve on the back, allowing you to attach it directly to your rolling suitcase handle. This is a convenient feature for travelers who want to keep their essentials organized and readily accessible.

    The inflatable pillow is a nice addition to the set, offering some neck support during long journeys. However, I found that the pillow wasn’t as firm as I’d prefer. It’s comfortable enough for short trips, but for longer flights or car rides, you might find yourself needing more substantial support. Also, the inflation process can be a bit fiddly, requiring you to pull up an air tube and manually blow into it.

    While the Nenolix Travel Blanket Airplane Compact offers a decent combination of features and portability at a reasonable price, it doesn’t quite reach the top tier of travel blanket sets. The blanket itself is warm and comfortable, but the inflatable pillow could be more supportive. Additionally, the manual inflation process for the pillow might be inconvenient for some users. Overall, it’s a decent option for budget-conscious travelers who prioritize portability, but those seeking a more premium travel experience might want to consider other options.

    Check Price on Amazon

    2. urnexttour Travel Pillow and Blanket Set

    urnexttour Travel Pillow and Blanket Set Neck Pillows Travel Essentials with Sleep Mask for Airplane Car Memory Foam Pink
    This Travel Pillow and Blanket Set is a game-changer for anyone who travels, especially by air or car. The set comes with a convenient duffel bag that features a secure hiking clasp, allowing you to easily clip the pillow and blanket to your backpack or luggage. This frees up your hands, making it ideal for navigating airports or jostling through crowds.

    The neck pillow is made of high-quality memory foam that conforms to the shape of your head and neck. It has a unique hump design that keeps your head and neck upright, alleviating pressure and soreness during long journeys. The 5-second rebound technology ensures the pillow bounces back to its original shape quickly, making it comfortable and durable. I especially liked the side pockets, perfect for stashing my phone or other small essentials.

    The blanket is incredibly soft and cozy, made from 100% plush polyester microfiber. It has a velvety feel that makes it inviting to snuggle up in. The generous size of 43 x 60 inches provides ample coverage for most people and can be used in various situations – from a quick nap on a plane to a cozy blanket during a car ride or even as a layer on chilly evenings.

    While the set is designed to be compact and lightweight, it does take a bit of time to fully expand after being compressed for shipping. I recommend leaving it unpacked for a day or two to regain its original fluffiness. Overall, this Travel Pillow and Blanket Set is a fantastic value for the price. The combination of comfort, convenience, and versatility makes it an essential travel companion for anyone who wants to make their journeys more pleasant.

    Check Price on Amazon

    1. BEDELITE Travel Blanket 2 in 1 Pillow & Blanket

    BEDELITE Travel Blanket Airplane Compact with Bag, Portable and Packable 2 in 1 Jacquard Travel Pillow and Blanket Set, Airplane Blanket Travel Essentials with Luggage Sleeve & Backpack Clip, Grey
    The BEDELITE Travel Blanket Airplane Compact is a game-changer for anyone who values comfort on the go. This 2-in-1 wonder transforms from a plush 65″x40″ blanket into a supportive travel pillow with just a few simple folds. I’ve used it extensively on flights and even for cozy evenings on the couch, and I’m consistently impressed by its versatility. The jacquard pattern adds a touch of elegance, making it feel more like a luxurious home accessory than a basic travel item.

    One of the standout features is the convenient luggage sleeve and backpack clip. No more fumbling with a bulky blanket while trying to navigate the airport! The sleeve easily attaches to my suitcase, and the clip securely fastens to my backpack, keeping my hands free and my travel essentials organized.

    The comfort level of this blanket is truly exceptional. The 100% microfiber polyester is incredibly soft and plush, like a warm hug on a chilly day. It’s also surprisingly warm, perfect for staying cozy on planes, in cars, or even while camping. While the soft fleece is a definite plus, I did notice that it can trap a bit of heat, which might be uncomfortable for some in warmer climates.

    Overall, the BEDELITE Travel Blanket Airplane Compact is an excellent value for money. Its versatility, thoughtful design, and exceptional comfort make it an indispensable travel companion. Whether you’re a frequent flyer or a casual traveler, this blanket will enhance your journey and provide much-needed relaxation wherever you go.

    Check Price on Amazon

    Frequently Asked Questions

    What materials are best for a travel pillow and blanket set?

    A: Look for sets made from lightweight, breathable materials like microfiber, fleece, or down alternatives. These materials are soft, comfortable, and pack down easily. Microfiber is known for its wrinkle resistance and easy cleaning, while fleece offers warmth and coziness. Down alternatives provide a similar loft and softness to down but are hypoallergenic.

    How do I choose the right size for my travel pillow and blanket?

    A: Consider your height and preference for how much coverage you need. For most adults, a pillow around 12-16 inches in diameter and a blanket that’s at least 50 inches long should be sufficient. If you tend to get cold easily, opt for a larger blanket.

    Are there any special features to look for in a travel pillow and blanket set?

    A: Yes! Some sets come with added features that enhance comfort and convenience. Look for:

    • Machine washable: Easy to clean after a trip.
    • Adjustable straps: For a secure fit on your neck or head.
    • Hidden pockets: To store your phone, keys, or other small items.
    • Built-in eye mask: To block out light and promote sleep.
    • Compression packing: Allows the set to be compressed for compact storage.

    Conclusion

    Whether you’re a frequent flyer or a weekend wanderer, a good travel pillow and blanket set can make all the difference in your comfort and well-being on the go.

    From plush microfiber to memory foam, and compact designs to luxurious wraps, there’s a perfect set out there for every traveler.

    So, invest in some comfort and elevate your next journey with one of these top-rated travel pillow blanket sets.

  • 6 Best Wedding Dress Bags for Air Travel 2025

    Saying “I do” is just the beginning of your happily ever after. But before you can waltz down the aisle in your dream gown, you’ve got to get it there! If you’re flying to your destination wedding, packing your precious dress can be a source of stress. Fear not, fabulous brides-to-be! We’ve rounded up the top 6 best wedding dress garment bags for air travel, ensuring your gown arrives wrinkle-free and ready for its big debut. From sturdy construction to luxurious lining, these bags offer ultimate protection and peace of mind, so you can focus on the celebration ahead.

    6. Your Bags Wedding Dress Bag – 72″ with 20″ Gusset

    Your Bags Wedding Dress Garment Bag - Garment Bags for Travel & Hanging Clothes or Storage Preservation - 72" Wedding Dress Bag for Gowns Long with 20" Gusset for Puffy Bridal Gowns Cover -White/Grey
    This Your Bags Wedding Dress Garment Bag comes in at position #6 out of 6, which tells you something right off the bat. While it offers many features that sound promising, it might not be the top choice for a discerning bride.

    The bag itself is indeed spacious. I found it easily accommodated my full-length wedding gown with room to spare for my veil and even a pair of shoes. The 72″ length and 20″ gusset truly live up to the “extra long and roomy” claims, perfect for those elaborate puffy gowns. The material feels decent, thicker than some other garment bags I’ve encountered, but not quite as luxurious as the ones they sell at bridal boutiques. It’s a noticeable step up from the flimsy 60gsm bags, but don’t expect it to feel like a high-end designer garment bag.

    The dual zippers and hanging loop work well, and the ID window is a handy addition for easy identification. Traveling with the bag was manageable, and it folded compactly enough to fit in my luggage. However, the bag’s lightweight nature, while good for travel, might also feel a bit cheap and flimsy. I wasn’t overly impressed with the overall construction, and it doesn’t feel as durable as some of the pricier options.

    For the price, the Your Bags Wedding Dress Garment Bag is a decent choice if you’re on a budget and need a functional bag to protect your gown. While it lacks some of the premium features and luxurious feel of higher-priced options, it does the job adequately. Just don’t expect it to be a heirloom-quality garment bag. If you’re looking for something truly special, you might want to consider investing in a more expensive option.

    Check Price on Amazon

    5. KEEGH Wedding Dress Garment Bag, Tri-fold, Accessory Pockets

    KEEGH Wedding Dress Garment Bag, 72” Tri-fold Bridal Dress Bags for Gowns, With Accessory Pockets and Adjustable Buckle Dress Cover for Wedding/Prom/Travel/Closet Storage (Beige)
    The KEEGH Wedding Dress Garment Bag is a decent option for protecting your gown during travel or storage, but it’s not without its shortcomings. The 72-inch length accommodates most long dresses, and the tri-fold design, while convenient for storage, can make the bag a bit bulky. The material, a blend of Oxford and non-woven fabric, feels sturdy enough, but the water-resistant claim is debatable. A light drizzle might be manageable, but heavy rain could potentially soak through.

    One of the bag’s standout features is the abundance of accessory pockets. Six pockets in total provide ample space for shoes, jewelry, veils, and even smaller items like passports or cards. This organization is a definite plus, especially when packing for a wedding trip. However, the clear PVC pockets, while convenient, feel a bit flimsy and might not offer optimal protection for delicate items.

    The bag’s compact folded size is a definite advantage for travel, though it might still be a tight squeeze in a carry-on suitcase. However, the bag isn’t particularly lightweight, making it feel a bit cumbersome to carry for extended periods. The adjustable buckle closure works well, but it lacks a secure lock, which might be a concern for those traveling with expensive gowns.

    Overall, the KEEGH Wedding Dress Garment Bag offers decent protection and organization at a reasonable price point. It’s a functional choice for travel and storage, but don’t expect it to be completely waterproof or ultra-lightweight. If you’re looking for a budget-friendly option with plenty of pockets, this bag might be worth considering. However, those prioritizing ultimate protection and portability might want to explore other options.

    Check Price on Amazon

    4. SLEEPING LAMB 72” Bridal Gown Bag Shoe Pockets

    SLEEPING LAMB 72'' Bridal Wedding Gown Dress Garment Bag 15'' Gusseted Garment Cover Shoe Pockets Travel Garment Storage Bag for Prom, Evening Gowns, Black
    This SLEEPING LAMB 72” Bridal Wedding Gown Dress Garment Bag is a decent option for protecting your formal attire, but it’s not without its shortcomings. On the plus side, the 72-inch length is perfect for maxi dresses, bridesmaid gowns, and even long tuxedoes. The 15-inch gusset provides ample room for puffy skirts and ballgowns, and the bag does a good job of preventing wrinkles and crushing.

    I appreciated the two mesh pockets which are useful for storing shoes, veils, jewelry, and other small accessories. This helps keep everything organized and prevents you from digging through your luggage for that missing pair of earrings. The trifold design with handles at both ends makes it relatively easy to carry, although it’s not the most comfortable to lug around for extended periods.

    While the smooth zipper works smoothly and the transparent PVC pouch is a handy addition for labeling, I found the material to be a bit thin. The 100G non-woven fabric, while breathable, doesn’t feel particularly durable and could potentially tear if handled roughly. I also noticed that the bag doesn’t offer much protection against moisture or stains.

    Overall, the SLEEPING LAMB garment bag is a functional and affordable option for protecting your dresses, but its lack of durability and limited protection against moisture might be a deal-breaker for some. If you’re looking for a more robust and reliable option, you might want to consider investing in a higher-quality garment bag.

    Check Price on Amazon

    3. MISSLO 65″ Long Garment Bags Waterproof

    MISSLO 65" Long Garment Bags for Travel Dress Bags Wedding Dress Cover Waterproof Clothing Bags Storage Traveling Clothes Protector for Closet Wardrobe Bags 2 Packs for Gowns, Tuxedos, Coats, Black
    The MISSLO 65″ Long Garment Bags are a decent option for protecting your clothes during travel or storage. Coming in a two-pack, they offer a good value proposition, especially if you need to pack multiple dresses or suits. The 65″ length is indeed ample for most gowns, coats, and even suits, making them suitable for a range of garments.

    The 4″ gusset is a notable feature, as it allows for a considerable amount of clothing to be stored within each bag. However, while it can comfortably hold several dresses or coats, the fabric itself isn’t particularly thick or durable. I found that heavier items like fur coats tended to put a strain on the material, and I wouldn’t be completely confident in its ability to withstand repeated use or rough handling.

    The water-resistant and dust-proof fabric is a definite plus, keeping your clothes protected from environmental damage. The breathable nature of the material is also appreciated, as it helps prevent mustiness. The clear window is convenient for quickly identifying the contents of each bag, and the full-length zipper makes accessing your clothes a breeze.

    While the trifold design and sturdy handles make these bags easy to transport, the lack of padding or additional protection for delicate garments is a drawback. For truly valuable or sensitive items, I’d recommend investing in a garment bag with more robust padding. Overall, the MISSLO 65″ Long Garment Bags offer decent protection and convenience at an affordable price, but they might not be the best choice for the most delicate or valuable clothing.

    Check Price on Amazon

    2. MISSLO Portable 70″ Dress Garment Bag

    MISSLO Portable 70" Wedding Dress Garment Bag with Bride Tote Bag 8'' Gusseted Dress Bags for Gowns Long 4 Pockets Dress Cover for Women, White
    The MISSLO Portable 70″ Wedding Dress Garment Bag is a dream come true for brides-to-be. It’s spacious, protective, and incredibly convenient, making it the perfect companion for transporting your precious gown to the wedding venue or storing it safely at home. What I loved most was the generous size – it easily accommodated my full-length, voluminous wedding dress without any bunching or wrinkles. The reinforced bottom provided extra support, ensuring the delicate fabric remained in pristine condition.

    One of the most thoughtful features is the inclusion of four zippered pockets. Two clear PVC pockets are perfect for stashing jewelry, a veil, or essential makeup, while the two breathable mesh pockets are ideal for shoes. This thoughtful design not only keeps everything organized but also prevents those small, delicate accessories from getting lost in the depths of the bag.

    Another standout feature is the easy-carry tote bag. It’s surprisingly sturdy and has an extended shoulder strap, so you can comfortably carry the garment bag even when it’s fully loaded. The bag folds neatly into the tote, making it incredibly portable. I appreciated the waterproof and tear-resistant oxford fabric, which provided excellent protection against dust, dirt, and accidental spills.

    While the bag is primarily designed for wedding gowns, its versatility extends to other formal dresses, long coats, or even delicate sportswear. The smooth stainless steel zipper glided effortlessly, making it a breeze to access your garments. Overall, the MISSLO Portable 70″ Wedding Dress Garment Bag offers exceptional value for money and provides a peace of mind knowing your precious dress is well-protected.

    Check Price on Amazon

    1. Zilink 72″ Wedding Dress Garment Bag Gusseted Pockets

    Zilink 72" Wedding Dress Garment Bag Dress Bags for Gowns Bridal Dress Travel Bag with 12”Gusseted and Accessory Pockets for Wedding Dress, Puffy Gowns [Upgraded Version]
    The Zilink 72″ Wedding Dress Garment Bag truly lives up to its name as a top-tier choice for protecting and transporting your precious gowns. Right from the start, its generous 72-inch length with a 12-inch gusset impressed me. This extra length is a lifesaver for those of us with floor-sweeping gowns or even extra-long bridesmaid dresses. I was especially grateful for the spaciousness when packing my voluminous wedding dress, knowing it would fit comfortably without any creases or wrinkles.

    What sets this garment bag apart is its thoughtful design. The 5 accessory pockets are a game-changer, allowing me to keep everything from shoes and jewelry to veils and perfume organized and secure. No more rummaging through a jumbled mess! Even the zippered closure adds a layer of convenience, transforming the bag into a handbag or shoulder bag when folded. It’s compact enough to easily carry around, whether it’s to the bridal suite or during travel.

    The quality of the Zilink garment bag is undeniable. The sturdy oxford fabric feels luxurious and durable, offering excellent protection against moisture and dust. The breathable material also prevents any musty odors from developing, ensuring your dress stays fresh. I particularly appreciated the water-resistant coating, knowing my gown would be safe even in unexpected rain showers.

    For the price, the Zilink 72″ Wedding Dress Garment Bag is an exceptional value. It combines practicality, style, and premium quality in a way that few other garment bags can match. The peace of mind knowing my wedding dress is safe and wrinkle-free during travel is priceless. If you’re looking for a reliable and well-designed garment bag for your special occasion gown, the Zilink is a fantastic choice you won’t regret.

    Check Price on Amazon

    Frequently Asked Questions

    Q: What makes a wedding dress garment bag ideal for air travel?

    A: A good wedding dress garment bag for air travel should be sturdy and spacious enough to fully protect your dress. Look for features like:

    • Reinforced seams and heavy-duty zippers: These will withstand the rigors of airport handling.
    • Padded shoulders and bust area: This prevents wrinkles and protects delicate embellishments.
    • Moisture-resistant material: Helps protect your dress from humidity and spills.
    • Multiple handles and a shoulder strap: Makes it easier to carry and maneuver through airports.
    • Clear window: Allows you to quickly identify your dress.

    Q: How do I pack my wedding dress in a garment bag for air travel?

    A: To pack your dress properly:

    1. Choose the right size bag: Make sure your dress fits comfortably with room to spare.
    2. Lay the dress flat: Avoid bunching or folding, as this can cause wrinkles.
    3. Use tissue paper: Wrap delicate areas like the bodice and train in tissue paper for extra protection.
    4. Fold the sleeves carefully: Fold them neatly inwards to prevent creases.
    5. Zip the bag securely: Double-check all zippers are closed.
    6. Store flat: Place the garment bag flat in your luggage to prevent crushing.

    Q: Can I check my garment bag as luggage?

    A: While you can check a garment bag, it’s generally recommended to keep it with you in the cabin if possible. This gives you more control over your precious dress and reduces the risk of damage during baggage handling. Check with your airline about their specific policies and limitations for garment bags in the cabin.

    Conclusion

    Choosing the right garment bag for your wedding dress air travel is crucial for keeping it pristine. From sturdy construction to customizable features, the options reviewed here cater to diverse needs and budgets. Whether you prioritize protection, portability, or style, there’s a perfect bag to ensure your dream dress arrives at your destination ready to wow. Safe travels and happy wedding!

  • How to Pack for a Week in a Backpack: A Comprehensive Guide to Smart Travel

    Packing for a week-long trip in a single backpack might sound daunting, but with the right strategies, it’s not only possible—it’s liberating. Whether you’re embarking on a minimalist adventure, a budget-friendly getaway, or simply want to avoid checked baggage fees, mastering the art of packing light is a game-changer. This guide will walk you through how to pack efficiently for seven days, focusing on space-saving techniques, essential items, and practical tips to keep you prepared without overloading your backpack. From clothing choices to toiletries and travel gear, we’ve got you covered with a semantic approach that ensures every entity—backpack, packing list, travel essentials—works together to meet your needs.

    Why Packing Light Matters for a Week-Long Trip

    Traveling with just a backpack offers unmatched freedom. You can breeze through airports, hop on public transport, and navigate cobblestone streets without dragging a bulky suitcase. But beyond convenience, packing light forces you to prioritize what’s truly necessary, reducing decision fatigue and keeping your journey stress-free. For a week-long trip, the key lies in balancing versatility, functionality, and comfort while keeping your load manageable—ideally under 15-20 pounds, depending on your backpack’s capacity (typically 30-50 liters for a week).

    Step 1: Choose the Right Backpack

    Before diving into what to pack, let’s address the foundation: your backpack. A week-long trip requires a bag that’s both spacious enough for essentials and compact enough to meet carry-on size restrictions (usually 22 x 14 x 9 inches, including handles and wheels). Look for a travel backpack with these attributes:

    • Capacity: 35-50 liters is ideal for a week.
    • Compartments: Multiple pockets and a dedicated laptop sleeve keep things organized.
    • Comfort: Padded shoulder straps, a hip belt, and breathable back padding reduce strain.
    • Durability: Water-resistant materials like nylon or polyester protect your gear.

    Popular options include the Osprey Farpoint 40 or Tortuga Outbreaker 35L. Your backpack is the cornerstone of this packing strategy—choose wisely based on your travel style, whether it’s urban exploration or outdoor trekking.

    Step 2: Plan Your Clothing with a Minimalist Mindset

    Clothing is the heaviest and bulkiest part of packing, so adopt a capsule wardrobe approach. Aim for versatile, lightweight pieces that mix and match while suiting your destination’s weather and activities. Here’s a sample packing list for a week:

    • Tops: 3-4 shirts (e.g., 2 moisture-wicking tees, 1 button-up or blouse). Opt for quick-dry fabrics like merino wool or polyester blends.
    • Bottoms: 2 pairs (e.g., 1 pair of pants or jeans, 1 pair of shorts or leggings). Neutral colors like black or khaki maximize outfit combinations.
    • Underwear and Socks: 7 pairs of each, prioritizing breathable, compact materials. Merino wool socks are odor-resistant and worth the investment.
    • Outerwear: 1 lightweight jacket (e.g., a packable raincoat or fleece), adjustable for layering.
    • Sleepwear: 1 set—keep it simple, like a t-shirt and shorts.
    • Shoes: 1 pair of comfortable walking shoes (worn during travel) and 1 pair of flip-flops or sandals for downtime or showers.

    Pro Tip: Layering and Laundry

    Pack clothes that layer well—think a t-shirt under a button-up with a jacket on top. For a week, plan to wash items mid-trip using a hotel sink or laundromat. Pack a small packet of travel laundry detergent (or a solid bar) to refresh your wardrobe without adding bulk.

    Step 3: Master Packing Techniques for Space Efficiency

    How you pack is as critical as what you pack. Use these space-saving methods to fit everything into your backpack:

    • Roll, Don’t Fold: Rolling clothes tightly minimizes wrinkles and saves space compared to folding.
    • Packing Cubes: These lightweight organizers compress clothing and categorize items (e.g., one cube for tops, another for bottoms). Look for slim, durable options.
    • Stuff Sacks: Use them for socks, underwear, or dirty laundry to keep small items contained.
    • Fill Gaps: Tuck small items like chargers or toiletries into shoes or corners of your backpack.

    Place heavier items (shoes, electronics) near the bottom and closer to your back for better weight distribution. Keep frequently used items (passport, snacks) in accessible outer pockets.

    Step 4: Pack Smart Toiletries

    Toiletries can quickly clutter your backpack, so stick to travel-sized essentials and multi-use products:

    • Basics: Toothbrush, travel-sized toothpaste, deodorant, and a small bar of soap (doubles as shampoo and laundry detergent).
    • Skin and Hair: A 3 oz. all-in-one face/body lotion and a tiny bottle of shampoo/conditioner combo.
    • Extras: Solid sunscreen stick, lip balm with SPF, and a compact microfiber towel.

    Use a clear, TSA-approved quart-sized bag for liquids if flying. For longer trips, plan to buy toiletries at your destination to save space on the way out.

    Step 5: Include Essential Travel Gear

    Beyond clothes and toiletries, a few key items ensure a smooth week-long trip:

    • Electronics: Phone, charger, power bank (10,000 mAh), and universal adapter. Add earbuds for entertainment.
    • Documents: Passport/ID, credit cards, and a photocopy of each (stored separately). Use a slim wallet or RFID-blocking pouch.
    • Health: Prescription meds, a small first-aid kit (bandages, pain reliever), and a reusable water bottle with filter.
    • Extras: A lightweight daypack (folds into itself), reusable shopping bag, and a travel lock for security.

    Step 6: Adapt to Your Trip Type

    Your packing list should reflect your travel purpose. For a city trip, prioritize stylish yet functional clothing. For hiking or outdoor adventures, swap sandals for sturdy boots and add a compact sleeping bag liner. Check the weather forecast and tweak your layers—swap a fleece for a down jacket in colder climates or add a swimsuit for beach destinations.

    Step 7: Test and Adjust Before You Go

    A week before departure, do a trial pack. Wear your backpack fully loaded for 15-20 minutes to test comfort and weight. If it’s too heavy (over 20% of your body weight), trim non-essentials—do you really need that extra pair of jeans? Refine your list until it feels right.

    Bonus Tips for a Stress-Free Experience

    • Digital Backup: Scan important documents and store them in a cloud service like Google Drive.
    • Snacks: Pack a few energy bars or nuts for emergencies—small but calorie-dense.
    • Stay Flexible: Leave a little room for souvenirs or unexpected needs.

    Final Thoughts on Packing for a Week in a Backpack

    Packing for a week in a backpack isn’t about sacrifice—it’s about intentionality. By choosing multi-purpose items, optimizing space with smart techniques, and tailoring your load to your trip, you’ll travel lighter, smarter, and more confidently. The semantic network of this process—connecting your backpack’s features, clothing versatility, and travel essentials—ensures you’re prepared without overcomplicating things. So, grab your bag, pack with purpose, and hit the road ready for anything the week throws your way.

  • Top 5 Luxury Travel Stroller Picks for 2025

    Navigating the world of luxury travel strollers can feel overwhelming. With countless options boasting premium features and sleek designs, choosing the perfect one for your little explorer can be a daunting task. But fear not, fellow jet-setting parents! We’ve done the legwork for you, scouring the market to curate a list of the top 5 best luxury travel system strollers. Get ready to discover strollers that seamlessly blend style, comfort, and functionality, ensuring a smooth and luxurious journey for both you and your precious cargo.

    5. UDV9-GREY 3 in 1 Foldable Stroller

    3 in 1 Baby Stroller Travel System Combo Set, Infant High Landscape Pram, Foldable Reversible Portable Standard Stroller, Newborn Pushchair Buggy, Reclining Baby Carriage (UDV9-GREY with Base)
    This 3-in-1 travel system stroller, while highly rated, does have some quirks that might not make it ideal for everyone. The “UDV9-GREY with Base” model boasts versatility, converting between a high landscape pram, a standard stroller, and a reclining carriage. This is excellent for accommodating your baby’s growth and changing needs. The breathable cotton material is undeniably soft and comfortable, though I did find it attracted dirt more easily than advertised.

    The high view design is a definite plus, giving your little one a great perspective of the world. The foldability is also convenient, though the mechanism feels a bit flimsy and I’d be cautious about its durability over time. The three-point shock absorption system is impressive and definitely smooths out bumps in the road, protecting your baby from jarring movements. The aluminum alloy frame provides good stability, which is important for maneuvering on uneven surfaces.

    The dual pushing modes, allowing both forward and backward facing, are a great feature, though I found the transitions between them a bit clunky. The multi-angle adjustable shed design is also promising, offering flexibility for various weather conditions. However, I noticed some looseness in the adjustments, which might be an issue for parents who prioritize precise control.

    Overall, the UDV9-GREY stroller offers a good balance of features and functionality. While the build quality might not feel as premium as some higher-priced options, it’s still a decent value for the money. The versatility and comfort features are definitely appealing, but be prepared for some minor drawbacks in terms of durability and adjustability.

    Check Price on Amazon

    4. UD588-Khaki 3 in 1 Reversible Baby Stroller

    3 in 1 Baby Travel System, Reversible Baby Stroller, Pushchair Luxury Baby High Landscape Pram, Portable Standard Pram Buggy, Foldable Baby Carriage for Newborn Toddler (UD588-Khaki with Base)
    This 3-in-1 baby travel system, the UD588-Khaki with Base, is a pretty versatile option for parents on the go. It easily transitions from a sleeping basket to a seat and carrycot, which is great for accommodating your baby’s changing needs as they grow. The stroller itself is adjustable, with a reclining backrest, adjustable leg rest, and a detachable foot cover, allowing you to customize the comfort for your little one. The large canopy offers shade from the sun, and the mesh skylight lets you check on your baby without disturbing them.

    One of the stroller’s biggest selling points is its spaciousness. The breathable mesh panels keep things airy, and the overall design feels roomy enough for even bigger toddlers. The large storage basket is definitely handy for carrying all the baby essentials. However, I did find that the basket isn’t the most secure, and items could fall out if you’re jostling around on uneven terrain.

    The one-handed folding mechanism is a real time-saver, and the 360-degree rotating front wheels make maneuvering this stroller a breeze. I appreciated the portability of the aluminum alloy frame, which made it easy to lift and carry. But, be aware that this stroller is not the lightest on the market.

    While the 3-in-1 system is great in theory, it does add some complexity to the overall design. The transitions between the different modes can be a bit fiddly, and it takes a bit of practice to get it right. Additionally, the fabric quality, while decent, doesn’t feel quite as luxurious as some higher-end strollers. Overall, the UD588-Khaki offers good functionality and value for money, but it might not be the most refined or luxurious option out there. If you’re looking for a practical and versatile stroller for everyday use, this one is worth considering.

    Check Price on Amazon

    3. Graco Modes Pramette 3-in-1 Stroller

    Graco Modes Pramette Travel System | Stroller & Car Seat Combo | 3-in-1 Stroller Modes | Includes Graco SnugRide 35 Infant Car Seat | Ellington
    The Graco Modes Pramette Travel System is a 3-in-1 stroller designed to grow with your baby. It transitions seamlessly from an infant car seat carrier to a pramette, and finally to a toddler stroller. This versatility is definitely a plus, especially for parents who want to avoid purchasing multiple products as their child grows. The included Graco SnugRide 35 Lite DLX Infant Car Seat is lightweight and easy to install, making it convenient for both travel and everyday use.

    One of the standout features is the reversible seat, allowing you to face your baby while they’re an infant and then switch to forward-facing as they get older. This is great for keeping an eye on your little one, especially in the early months. The toddler seat converts into a pramette, which is a nice touch for younger babies who need extra support and a reclined position. The stroller itself is relatively lightweight and compact, making it manageable to maneuver around, though it’s not the absolute lightest on the market.

    While the Graco Modes Pramette Travel System boasts several convenient features like a one-hand fold, a large storage basket, and a multi-position reclining seat, there are a few drawbacks to consider. The fabric feels a bit thin and less premium than some other strollers in its price range. Additionally, the canopy, while it does have a peekaboo window, doesn’t offer as much sun protection as I’d like.

    Overall, the Graco Modes Pramette Travel System offers a decent value for the price, especially considering its versatility and the included car seat. It’s a solid option for parents who are looking for a stroller that can grow with their child, but those seeking top-tier materials and sun protection might want to explore other options.

    Check Price on Amazon

    2. UD588-BLACKGOLD 3-in-1 Reversible Stroller

    3 in 1 Baby Travel System Reversible Baby Stroller Pushchair Portable Baby Standard Pram Buggy Baby Carriage Foldable Luxury Baby High Landscape Pram for Toddler Newborn (UD588-BLACKGOLD with Base)
    This 3-in-1 travel system is a fantastic all-around option for parents looking for a versatile and comfortable ride for their little one. From newborn to toddler, this stroller has you covered. I was particularly impressed with its adaptability. The reversible seat allows you to face your baby or have them look forward, which is great for both newborns who need to be close and older babies who want to explore.

    The high view design is a definite plus. My child loved being able to see everything around them, and I appreciated the sense of openness it provided. The stroller also folds surprisingly compactly, making it easy to store and transport. The fabric is soft, breathable, and feels durable. While it’s certainly not the lightest stroller I’ve used, it’s manageable for everyday walks. I found the double pushing modes and multi-angle adjustable shed design to be very useful. Being able to switch between forward and backward facing was great for adapting to different situations and my child’s preferences.

    The sturdy aluminum alloy frame gives me confidence that this stroller can handle a good amount of wear and tear. The independent shock-absorbing frame does a great job of smoothing out bumps and uneven terrain, making for a comfortable ride for both baby and parent. I also appreciate the thoughtful details, like the easy-to-use brakes and the large storage basket.

    Overall, this stroller offers a great balance of features, comfort, and value for money. While it might not be the sleekest or most lightweight option on the market, its versatility, durability, and attention to detail make it a top contender for any parent looking for a reliable and comfortable stroller for their growing child.

    Check Price on Amazon

    1. Chicco Corso LE Stroller & KeyFit 35

    Chicco Modular Travel System - Corso LE Stroller, KeyFit 35 Infant Car Seat and Base - Stroller and Car Seat Combo in Veranda/Grey
    The Chicco Modular Travel System – Corso LE Stroller, KeyFit 35 Infant Car Seat and Base in Veranda/Grey is a true game-changer for parents. This luxurious travel system seamlessly combines the Corso LE stroller with the KeyFit 35 infant car seat, creating a versatile and convenient solution for all your baby’s transportation needs. The stroller itself is incredibly versatile, offering four different modes: parent-facing, forward-facing, car seat carrier, and a reversible seat (great for when your little one wants to see the world!). The one-hand fold is a lifesaver, especially when juggling a baby and other essentials.

    What truly sets this travel system apart is the attention to detail. The Corso LE stroller boasts premium leatherette accents that elevate its style, while the multi-position reclining seat ensures your baby is always comfortable. The large wheels with foam filled rubber tires glide effortlessly over various terrains, and the zip-extend canopy provides ample shade from the sun. The extra-large storage basket is deep enough to fit all the diaper bags and necessities, and the two expandable bottle pockets keep your little one’s drinks within reach.

    The KeyFit 35 infant car seat is equally impressive. It is designed with safety as a top priority, featuring the innovative SuperCinch force-multiplying tightener for easy and secure installation. The bubble level-indicators and one-hand leveling system guarantee accurate installation every time, giving you peace of mind. The car seat includes newborn head and body support, ensuring your precious cargo is cradled comfortably.

    The “Easy-Extend Headrest System” with no-rethread harness on the KeyFit 35 is a brilliant design feature that allows for extended rear-facing use. This means you can keep your baby rear-facing for longer, maximizing their safety. While the stroller is incredibly lightweight and easy to maneuver, it’s worth noting that the fold can be a bit bulky compared to some other strollers. Overall, the Chicco Modular Travel System – Corso LE Stroller, KeyFit 35 Infant Car Seat and Base offers an exceptional combination of style, functionality, and safety. Its versatility, user-friendly design, and luxurious features make it a truly worthwhile investment for parents seeking a premium travel system.

    Check Price on Amazon

    Frequently Asked Questions

    What makes a stroller a “luxury” travel system?

    A luxury travel system goes beyond basic functionality. These strollers typically feature premium materials like high-grade fabrics, lightweight yet durable aluminum frames, and smooth-rolling wheels designed for all terrains. They often boast advanced suspension systems for a comfortable ride, multi-position reclining seats with ample padding, and easy-fold mechanisms for compact storage. Luxury travel systems also usually include a variety of extras like sunshades, rain covers, and travel bags, making them ideal for discerning parents who prioritize both style and convenience.

    Which brands are considered top-tier for luxury travel strollers?

    Several brands consistently rank among the best for luxury travel systems. Some popular choices include:

    • Bugaboo: Known for their sleek designs, innovative features, and high-quality construction.
    • Uppababy: Offers a wide range of stylish and versatile strollers with top-notch performance.
    • Nuna: Features modern aesthetics, premium materials, and a focus on safety and comfort.
    • Mountain Buggy: Specializes in rugged and durable strollers built to handle challenging terrain.
    • Joolz: Emphasizes sustainability and minimalist design with a focus on functionality.

    How much does a luxury travel system typically cost?

    Luxury travel systems come with a higher price tag compared to standard models. You can expect to spend anywhere from $600 to $1500 or more, depending on the brand, features, and included accessories. While the initial investment is significant, many parents find the durability, comfort, and ease of use justify the expense, especially for frequent travelers.

    Conclusion

    Choosing the perfect luxury travel system stroller is an investment in your family’s comfort and convenience. Whether you prioritize smooth rides, stylish design, or ultimate versatility, the options reviewed here offer a world-class travel experience. Consider your individual needs and preferences to find the stroller that best suits your family’s adventures. Happy travels!

  • Can You Bring a Stainless Steel Water Bottle on a Plane? Your Complete Guide

    Traveling by air comes with its share of questions, especially when it comes to what you can and cannot bring on board. One common concern for eco-conscious travelers and hydration enthusiasts alike is: Can you bring a stainless steel water bottle on a plane? The short answer is yes, but there are specific rules and practical tips you need to know to breeze through airport security and stay hydrated during your flight. In this comprehensive guide, we’ll dive into Transportation Security Administration (TSA) regulations, airline policies, and expert advice to ensure your stainless steel water bottle makes the journey with you—hassle-free.

    TSA Rules: Stainless Steel Water Bottles and the 3-1-1 Liquid Rule

    When it comes to air travel in the United States, the TSA sets the standard for what’s allowed in your carry-on luggage. Stainless steel water bottles are permitted on planes, but there’s a catch—they must be empty when passing through security checkpoints. This rule ties directly into the TSA’s 3-1-1 liquid policy, which restricts liquids, gels, and aerosols in carry-on bags to containers of 3.4 ounces (100 milliliters) or less, all fitting into a single quart-sized, clear plastic bag.

    Why the restriction? It’s all about safety. Liquid explosives pose a potential threat, and limiting the volume of liquids passengers can bring reduces that risk. A full stainless steel water bottle, even if it’s just water, exceeds the 3.4-ounce limit and won’t make it past the X-ray machine unless it’s in your checked baggage. However, an empty stainless steel bottle sidesteps this issue entirely. Once you’re through security, you’re free to fill it up at a water fountain or bottle-filling station—options that are increasingly common in modern airports.

    The material of the bottle—stainless steel, in this case—doesn’t matter to the TSA. Whether it’s metal, plastic, or silicone, the same liquid rules apply. So, your durable, eco-friendly stainless steel water bottle is just as welcome as a collapsible plastic one, as long as it’s dry when you approach the screening area.

    Checked Baggage vs. Carry-On: Where Should Your Bottle Go?

    You’ve got two options for bringing your stainless steel water bottle on a plane: carry-on or checked baggage. Each has its pros and cons, depending on your travel needs.

    Carry-On Convenience

    Packing your stainless steel water bottle in your carry-on is the most practical choice for most travelers. An empty bottle takes up minimal space, and once you’re past security, you can refill it to stay hydrated during your flight. Airplane cabins are notoriously dry, with humidity levels often dipping below 20%, so having water on hand is a game-changer for comfort. Plus, you avoid the inflated prices of airport bottled water—a win for both your wallet and the planet.

    Checked Baggage Considerations

    If you prefer to pack your bottle in checked luggage, there are no liquid restrictions to worry about. You can even fill it with water before checking your bag, though this adds unnecessary weight (water is heavy!) and risks a leak if the cap isn’t secure. Checked bags get tossed around during handling, so a leak-proof design is non-negotiable if you go this route. That said, most travelers opt for carry-on to keep their bottle accessible and avoid the hassle of digging through luggage at their destination.

    Why Stainless Steel? Benefits of Choosing This Material

    Stainless steel water bottles have surged in popularity for good reason. They’re durable, reusable, and environmentally friendly—perfect for travelers who want to cut down on single-use plastics. But how do they stack up for air travel specifically?

    • Durability: Unlike glass, which can shatter, or plastic, which may crack under pressure, stainless steel can withstand the rigors of travel—think bumpy flights or overstuffed carry-ons.
    • Temperature Retention: Many stainless steel bottles are double-walled and insulated, keeping water cold (or hot) for hours. This is a perk on long flights where cabin temperature fluctuates.
    • Sustainability: Bringing your own bottle reduces reliance on plastic water bottles sold at airports, aligning with a greener travel mindset.

    The TSA doesn’t care about these benefits—they’re just checking for liquids—but for you, these attributes make stainless steel a standout choice.

    International Flights: Do the Rules Change?

    If you’re flying internationally, the good news is that stainless steel water bottles are still allowed, but the rules can vary slightly depending on the country and airport. Most nations adhere to a similar standard as the TSA’s 3-1-1 rule, capping liquids in carry-ons at 100 milliliters. An empty stainless steel water bottle remains universally acceptable in carry-on luggage, though some airports—like London Heathrow or Dubai International—have been known to enforce stricter policies, occasionally confiscating even empty bottles at security’s discretion.

    To avoid surprises, check the security guidelines of your departure, layover, and destination airports before you travel. For instance, as of mid-2024, the UK began allowing up to 2 liters of liquid through security at select airports with advanced screening technology, but this isn’t widespread yet. When in doubt, stick to the empty-bottle strategy—it’s the safest bet worldwide.

    How to Travel Smart with Your Stainless Steel Water Bottle

    Bringing your stainless steel water bottle on a plane is straightforward, but a few pro tips can make the process seamless:

    1. Empty It Completely: Before you reach security, dump any water and shake out residual drops. A damp bottle might raise questions, so ensure it’s bone-dry.
    2. Place It in the Bin: At the checkpoint, put your bottle in a separate tray for screening, just like your laptop or shoes. This helps TSA agents see it clearly and avoids delays.
    3. Refill Post-Security: Look for water fountains or hydration stations after clearing security. Many airports, like Denver International or San Francisco International, now offer filtered water stations designed for reusable bottles.
    4. Ask Flight Attendants: Onboard, don’t hesitate to ask for a refill. Most airlines provide free water, and flight attendants are usually happy to top off your bottle.
    5. Choose the Right Size: Opt for a bottle that fits easily in your carry-on—18 to 32 ounces is ideal for most travelers. Oversized bottles (like a 64-ounce jug) might draw extra scrutiny, even if empty.

    Exceptions to the Liquid Rule: When Full Bottles Are Allowed

    There are rare cases where you can bring a full stainless steel water bottle through security, but these apply to specific situations:

    • Medically Necessary Liquids: If you need water for a medical condition (e.g., to take medication), you can bring more than 3.4 ounces. Declare it to TSA officers and carry supporting documentation, like a doctor’s note, though it’s not always required.
    • Baby Needs: Parents can bring water for formula or breastfeeding beyond the 3.4-ounce limit. You’ll need to inform security and allow extra screening.

    For the average traveler, though, these exceptions don’t apply—empty is the way to go.

    Common Myths Debunked

    Let’s clear up some misconceptions about bringing stainless steel water bottles on planes:

    • Myth: Metal Bottles Aren’t Allowed: False. The TSA permits metal containers, including stainless steel, as long as they’re empty of liquids.
    • Myth: You Can Sneak Water Through: Don’t try it. X-ray machines catch liquids, and you’ll either toss the water or face a longer screening process.
    • Myth: All Airports Are the Same: Not true. While TSA rules are standard in the U.S., international airports may have quirks, so always double-check.

    Eco-Friendly Travel: Why It Matters

    Carrying a stainless steel water bottle isn’t just about convenience—it’s a small step toward sustainable travel. Airports generate massive amounts of plastic waste from single-use bottles, with millions discarded annually. By refilling your reusable bottle, you’re cutting down on that waste and saving money (airport water can cost $3–$5 a pop). It’s a win-win for you and the environment.

    Final Thoughts: Hydration Without the Headache

    So, can you bring a stainless steel water bottle on a plane? Absolutely—empty it before security, refill it after, and you’re good to go. Whether you’re jetting off domestically or internationally, this trusty travel companion fits seamlessly into your carry-on routine. It’s practical, eco-friendly, and keeps you hydrated at 30,000 feet. Next time you pack, toss in that stainless steel bottle with confidence—your thirst (and the planet) will thank you.

  • Can I Use a Roof Bag Without Rails? Your Ultimate Guide to Rooftop Storage Solutions

    When planning a road trip, family vacation, or outdoor adventure, maximizing your vehicle’s storage capacity becomes a top priority. For many, a roof bag emerges as an affordable, flexible solution to haul extra luggage, camping gear, or sports equipment. But what happens if your car doesn’t have roof rails? Can you still use a roof bag without rails, and is it safe and practical to do so? In this comprehensive guide, we’ll dive deep into this question, exploring the feasibility, safety considerations, installation methods, and alternative options—all tailored to help you make an informed decision while keeping your journey smooth and stress-free.

    Understanding Roof Bags and Their Purpose

    A roof bag, often referred to as a rooftop cargo carrier or soft car top carrier, is a flexible, weather-resistant storage solution designed to sit atop your vehicle. Unlike hard-shell cargo boxes, roof bags are lightweight, foldable, and typically more budget-friendly, making them a popular choice for travelers. They come in various sizes—ranging from 10 to 20 cubic feet—and are crafted from durable materials like PVC or nylon to protect your belongings from rain, wind, and sun exposure.

    Traditionally, roof bags are secured to roof racks or crossbars, which provide a stable foundation and anchor points. However, many modern vehicles—especially sedans, coupes, or compact cars—lack factory-installed roof rails or crossbars. This raises the question: Can you bypass the need for rails and still use a roof bag effectively? The short answer is yes, but it comes with nuances worth exploring.

    Can You Use a Roof Bag Without Rails? The Straightforward Answer

    Absolutely, you can use a roof bag without rails! Many manufacturers design rooftop cargo carriers specifically for vehicles without roof racks, incorporating innovative attachment systems like door hooks, straps, or suction cups. These rail-less roof bags are engineered to be versatile, offering a secure fit on a variety of car types—sedans, SUVs, hatchbacks, or vans—without requiring permanent modifications or costly add-ons like crossbars.

    The key lies in selecting a roof bag designed for this purpose and following proper installation techniques. While rails or crossbars provide added stability, they aren’t a prerequisite for safe usage. Modern rail-less roof bags leverage alternative anchoring methods to ensure your cargo stays put, even on long drives or at highway speeds.

    How to Secure a Roof Bag Without Rails

    Securing a roof bag without rails requires attention to detail, but it’s simpler than you might think. Here’s a step-by-step breakdown of how it works:

    1. Choose the Right Roof Bag

    Not all roof bags are created equal. Opt for a model explicitly labeled as compatible with vehicles “with or without racks.” These typically include straps or hooks designed for rail-less installation. Look for features like waterproof zippers, heavy-duty materials (e.g., 900D PVC), and a non-slip mat to protect your car’s roof and enhance grip.

    2. Position the Bag Properly

    Place the roof bag centrally on your vehicle’s roof, ensuring it doesn’t overhang the windshield or rear window, which could obstruct visibility or aerodynamics. A well-centered bag distributes weight evenly, reducing strain on your car’s roof and improving stability.

    3. Use Door Hooks or Straps

    Most rail-less roof bags come with straps that thread through the interior of your vehicle, attaching via door hooks or clips. These hooks latch onto the door frame or weatherstripping, providing secure anchor points. Open your car doors, pass the straps inside, and close the doors over them—ensuring a tight seal without damaging the weatherstripping.

    4. Add a Protective Layer

    To prevent scratches or scuffs on your car’s paint, place a non-slip mat or protective pad (often included with the roof bag) between the bag and the roof. This also minimizes sliding during transit, especially on smooth or curved roofs.

    5. Tighten and Test

    Secure all straps firmly, following the manufacturer’s instructions. Tug on the bag to confirm it’s immobile. Before hitting the road, take a short test drive to ensure everything stays in place, adjusting as needed.

    Safety Considerations for Using a Roof Bag Without Rails

    While it’s possible to use a roof bag without rails, safety remains paramount. Here are critical factors to keep in mind:

    • Weight Limits: Check your vehicle’s roof load capacity (typically 100-165 pounds for most cars) and the roof bag’s maximum weight. Overloading can damage your roof or affect handling.
    • Speed and Driving Conditions: Without rails, the bag relies entirely on straps for stability. Drive cautiously, especially in windy conditions or at high speeds (stick to 65-70 mph or lower, as recommended by most manufacturers).
    • Even Weight Distribution: Pack heavier items toward the front of the bag and lighter items at the back to maintain balance and aerodynamics.
    • Regular Checks: Stop periodically to inspect the straps and bag, ensuring nothing has shifted or loosened during travel.
    • Airbag Interference: Avoid threading straps in a way that obstructs side curtain airbags, as this could compromise safety in an accident.

    When installed correctly, a rail-less roof bag can be just as secure as one mounted on rails, but cutting corners or ignoring guidelines could lead to cargo loss or vehicle damage.

    Pros and Cons of Using a Roof Bag Without Rails

    Advantages

    • Cost-Effective: No need to invest in roof racks or crossbars, which can cost $100-$300 or more.
    • Versatility: Works on almost any vehicle, from sleek sedans to SUVs, without permanent modifications.
    • Easy Storage: Soft roof bags fold compactly when not in use, unlike rigid cargo boxes or racks.
    • Quick Setup: Installation is straightforward, often taking just 10-15 minutes.

    Disadvantages

    • Stability Concerns: Without rails, the bag may be more prone to slight movement, especially if straps aren’t tightened properly.
    • Potential Roof Damage: Prolonged use or improper setup could scratch or dent your roof, particularly if heavy items press directly on the surface.
    • Aerodynamic Drag: Roof bags without rails may increase wind resistance, slightly reducing fuel efficiency compared to streamlined cargo boxes.

    Alternatives to Roof Bags Without Rails

    If the idea of a rail-less roof bag doesn’t fully convince you, consider these alternatives to boost your vehicle’s storage capacity:

    1. Temporary Roof Rack Systems

    Soft roof racks, like the Streetwize or similar models, use padded bars and straps that attach via door frames. These provide a pseudo-crossbar setup for your roof bag, enhancing stability without permanent installation.

    2. Hitch-Mounted Cargo Carriers

    If your car has a tow hitch, a hitch-mounted platform or cargo bag offers a rear-mounted solution. This keeps weight off the roof, avoids clearance issues, and simplifies loading/unloading.

    3. Trunk Space Optimization

    Maximize your car’s existing space with organizers, vacuum-sealed bags, or collapsible gear. While not as expansive as a roof bag, this avoids rooftop concerns entirely.

    4. Aftermarket Roof Rails or Crossbars

    For frequent travelers, investing in model-specific roof rails or crossbars (e.g., Thule or Yakima systems) provides a long-term, sturdy foundation for roof bags or boxes. Many cars have hidden mounting points under roof trim—check your manual.

    Real-World Experiences: Does It Actually Work?

    Thousands of drivers successfully use roof bags without rails every day. For instance, owners of vehicles like the Honda Accord or Toyota Prius—models often lacking factory rails—report seamless trips with brands like RoofPax, RoofBag, or ToolGuards. Users praise the ease of setup and waterproofing, though some note minor paint scuffs if a protective mat isn’t used. On highways or in rain, a properly secured bag holds up, but overloading or sloppy installation can lead to shifting or noise.

    Tips to Enhance Your Roof Bag Experience

    • Invest in Quality: Choose a bag with reinforced straps, double-stitched seams, and a warranty for peace of mind.
    • Pack Smart: Use soft, flexible items (e.g., clothes, sleeping bags) rather than rigid objects to avoid roof dents.
    • Monitor Weather: In heavy rain or wind, double-check waterproofing and strap tension.
    • Legal Check: Ensure your setup complies with local road laws—some regions frown on straps crossing the interior.

    Final Verdict: Should You Use a Roof Bag Without Rails?

    Yes, you can confidently use a roof bag without rails, provided you select a compatible model and install it correctly. It’s a practical, budget-friendly way to expand your car’s storage for occasional trips or one-off adventures. However, if you plan frequent heavy-duty hauls, investing in crossbars or a hitch carrier might offer greater peace of mind and durability.

    Ultimately, the decision hinges on your needs—short-term convenience or long-term reliability. Either way, a roof bag without rails opens up a world of possibilities, letting you hit the road with everything you need, no rails required.

    Ready to pack up and go? Choose a rail-less roof bag that fits your car and travel style, and enjoy the extra space without the extra hassle. Safe travels!

  • How to Put Skis in a Ski Bag: A Step-by-Step Guide for Hassle-Free Packing

    Packing your skis into a ski bag might seem like a straightforward task, but doing it properly can save you time, protect your gear, and make your trip to the slopes much smoother. Whether you’re a seasoned skier or a beginner preparing for your first snowy adventure, knowing how to pack skis efficiently is key to ensuring they stay safe during transport. In this guide, we’ll walk you through the process of putting skis in a ski bag, step by step, while offering practical tips to maximize protection and convenience. Let’s dive into everything you need to know about ski bag packing, from choosing the right bag to securing your equipment like a pro.

    Step 1: Gather Your Gear and Choose the Right Ski Bag

    Before you start packing, make sure you have everything you need. You’ll obviously need your skis, but it’s also wise to grab your ski bag, ski straps (if your skis don’t already have them), and any padding materials like towels or bubble wrap for extra protection. The first thing to consider is the type of ski bag you’re using. Ski bags come in various styles—padded, unpadded, wheeled, or double-capacity bags designed to hold multiple pairs.

    For most skiers, a padded ski bag that matches the length of your skis (typically 160-190 cm, depending on your ski size) is ideal. Check the bag’s dimensions to ensure it fits your alpine skis, cross-country skis, or freestyle skis snugly. A bag that’s too small won’t close properly, while one that’s too large leaves room for your skis to slide around, risking damage. If you’re traveling by plane, opt for a durable, padded bag with wheels for easy handling at the airport.

    Step 2: Prepare Your Skis for Packing

    Once you’ve got the right ski bag, it’s time to prep your skis. Start by cleaning them off—remove any snow, dirt, or moisture from the bases and edges. Wet skis can lead to rust or damage inside the bag, especially during long trips. Use a dry cloth to wipe them down thoroughly. Next, secure your skis together. Most skis have a slight camber (the upward curve in the middle), so align them base-to-base to keep them compact.

    If your skis don’t have built-in clips, use ski straps or Velcro ties to fasten them at the tips and tails. This prevents them from rubbing against each other and scratching the bases or edges. For added protection, consider wrapping the bindings with a towel or foam padding—bindings are prone to getting knocked around, and this simple trick can save you from costly repairs.

    Step 3: Slide Your Skis Into the Ski Bag

    Now comes the main event: putting your skis into the ski bag. Lay the bag flat on the ground and unzip it fully. Most ski bags have a long zipper running along the top or side, giving you easy access to the interior. Position your skis with the tips facing the narrower end of the bag (if it’s tapered) and the tails toward the wider, open end. Gently slide the skis in, making sure they don’t catch on the zipper or inner fabric.

    If your bag has internal straps or sleeves, use them to secure the skis in place. Some high-end bags even have padded compartments to keep everything snug—just follow the design. For double ski bags, you can stack a second pair alongside the first, but avoid overloading unless the bag is built for it. Overstuffing can strain the zippers and reduce the bag’s protective ability.

    Step 4: Add Extra Gear (Optional) and Pad for Protection

    Many ski bags have room for more than just skis, so take advantage of the space. You can tuck in your ski poles along the sides—just collapse them if they’re adjustable—or pack small items like gloves, goggles, or a wax kit. Be mindful not to cram sharp objects like pole tips directly against your skis; wrap them in a cloth if needed.

    For extra cushioning, especially if you’re flying or checking the bag, slide in some soft items like a jacket or socks around the skis. This not only protects your gear but also keeps everything from shifting during transit. Avoid overpacking, though—leave enough room to zip the bag closed without forcing it.

    Step 5: Zip Up and Secure the Bag

    With your skis and extras in place, it’s time to seal the deal. Pull the zipper closed slowly, checking that no fabric, straps, or ski edges get caught. If the bag has compression straps or buckles, tighten them to keep everything compact. For wheeled ski bags, test the handle and wheels to ensure they’re functioning before you head out. If you’re traveling, attach a luggage tag with your contact info—just in case.

    Pro Tips for Packing Skis Like a Seasoned Skier

    • Measure Twice, Pack Once: Double-check your ski length (tip to tail) against the bag’s capacity. Skis range from 140 cm for kids to over 200 cm for advanced powder skis, so pick a bag that fits.
    • Air Travel Hack: Airlines often have specific ski baggage policies—some count a ski bag and boot bag as one item, so check with your carrier to avoid extra fees.
    • Storage Off-Season: If you’re packing skis for storage, add a light coat of wax to the bases to prevent rust and keep them in a cool, dry place.
    • Label Bindings: For multi-pair bags, tag your skis with your name to avoid mix-ups on group trips.

    Why Proper Ski Bag Packing Matters

    Packing your skis correctly isn’t just about convenience—it’s about protecting your investment. A good pair of skis can cost anywhere from $300 to over $1,000, and dents, scratches, or broken bindings can ruin your season. A well-packed ski bag reduces the risk of damage whether you’re tossing it in the car, checking it on a flight, or hauling it to the lodge. Plus, it saves you the headache of dealing with loose gear or busted zippers when you’re ready to hit the slopes.

    Common Mistakes to Avoid

    Even experienced skiers slip up sometimes. Don’t pack wet skis—moisture can seep into the bag and damage both the skis and the fabric. Avoid forcing the zipper if it’s tight; rearrange the contents instead. And never skip securing the skis together—unstrapped skis can shift and bang into each other, leading to scratches or worse.

    Choosing the Best Ski Bag for Your Needs

    Not all ski bags are created equal. If you’re in the market for one, consider your skiing style and travel habits. Frequent flyers might prefer a heavy-duty wheeled bag with thick padding, like the Sportube Series 2 or Thule RoundTrip. Casual skiers can get by with a lightweight, unpadded option for short car trips. Look for features like waterproof linings, durable zippers, and adjustable sizing if you own multiple pairs of skis.

    Final Thoughts on Packing Skis in a Ski Bag

    Learning how to put skis in a ski bag is a small but essential skill for any skier. By choosing the right bag, prepping your skis, and packing them carefully, you’ll ensure your gear stays safe and ready for action. Whether you’re heading to the Rockies, the Alps, or your local hill, a little effort upfront means more time shredding the powder and less time worrying about damaged equipment. So grab your ski bag, follow these steps, and get ready for an epic day on the mountain!

  • How to Pack a Pillow for Travel: A Complete Guide to Comfort on the Go

    Traveling can be an exciting adventure, but it often comes with challenges like staying comfortable during long journeys. Whether you’re hopping on a plane, embarking on a road trip, or taking a train, a pillow can make all the difference in getting some rest. However, packing a pillow efficiently can feel tricky—how do you fit it into your luggage without sacrificing space or damaging it? In this guide, we’ll walk you through practical, step-by-step methods to pack a pillow for travel, ensuring you stay comfortable while keeping your packing hassle-free. From choosing the right pillow to mastering space-saving techniques, we’ve got you covered with tips that balance convenience and functionality.

    Why Packing a Pillow for Travel Matters

    A good pillow isn’t just about luxury—it’s about supporting your neck, back, and head during those awkward travel naps. Studies show that poor sleep posture can lead to stiffness and fatigue, which is the last thing you want when you arrive at your destination. Bringing your own pillow also ensures familiarity and hygiene, especially compared to the flimsy options airlines or hotels sometimes provide. The key is knowing how to pack it smartly so it doesn’t become a bulky burden. Let’s dive into the best ways to do just that.

    Step 1: Choose the Right Pillow for Travel

    Not all pillows are created equal when it comes to portability. Before packing, consider the type of pillow that suits your travel needs:

    • Memory Foam Pillows: These contour to your shape and offer great support, but they can be bulky. Look for travel-sized versions or compressible options.
    • Inflatable Pillows: Lightweight and compact when deflated, these are perfect for minimalist travelers. They inflate quickly for use and stow away easily.
    • Microbead Pillows: Often used as neck pillows, these are flexible and moldable, making them easy to pack into tight spaces.
    • Down or Feather Pillows: Soft and cozy, but they’re harder to compress unless vacuum-sealed (more on that later).
    • Travel-Specific Pillows: Brands like Cabeau or Trtl design pillows with travel in mind—compact, supportive, and often equipped with carrying clips.

    Pick a pillow based on your comfort preferences and the space you’re willing to dedicate in your bag. A smaller, travel-friendly pillow is usually the best bet for most trips.

    Step 2: Compress Your Pillow Efficiently

    Once you’ve chosen your pillow, the next challenge is making it fit. Here are proven compression methods to shrink its size without ruining it:

    Use a Compression Bag

    Compression bags are a game-changer for packing pillows. Here’s how to do it:

    1. Place your pillow inside a compression sack (available at outdoor stores or online).
    2. Seal the bag tightly, squeezing out excess air as you go.
    3. Roll or press the bag to force out remaining air through the one-way valve.
    4. Secure it with straps or zippers.

    This method can reduce a standard pillow to a fraction of its size, perfect for fitting into a suitcase or carry-on.

    Vacuum-Seal for Maximum Space-Saving

    For bulkier pillows like down or memory foam:

    1. Slide the pillow into a large vacuum-seal bag (like those used for bedding storage).
    2. Use a vacuum cleaner to suck out the air until the pillow flattens.
    3. Seal the bag shut.

    This works wonders for checked luggage but might be overkill for a carry-on due to the stiff, flat shape it creates.

    Roll and Tie Technique

    No special tools? No problem.

    1. Lay the pillow flat on a clean surface.
    2. Fold it in half lengthwise.
    3. Roll it tightly from one end to the other, squeezing as you go.
    4. Secure it with a strap, belt, or even a shoelace to keep it compact.

    This method is ideal for soft pillows and quick packing.

    Step 3: Pack It Strategically in Your Luggage

    Where and how you place your pillow in your bag matters. Here are some smart packing strategies:

    • Carry-On Option: Tuck the compressed pillow into the top of your backpack or suitcase for easy access. If it’s small, like an inflatable or microbead pillow, slip it into a side pocket.
    • Checked Luggage: Nestle it between clothes to save space and cushion fragile items. A vacuum-sealed pillow can slide along the bottom or sides.
    • Wearable Hack: For neck pillows, clip them to your bag’s strap or wear them around your neck through the airport—no extra space needed.
    • Car Travel: If you’re driving, toss the pillow loose in the backseat or trunk. No need to overthink compression here unless space is tight.

    Pro tip: Use your pillow as a buffer to protect electronics or souvenirs in your bag—it’s a win-win for space and safety.

    Step 4: Keep Your Pillow Clean and Fresh

    Travel can expose your pillow to dirt, spills, and germs. Protect it with these simple steps:

    • Pillowcase or Cover: Slip on a removable, washable pillowcase before packing. Opt for a lightweight fabric like cotton or microfiber.
    • Plastic Bag Backup: For extra protection (especially in checked luggage), wrap it in a plastic bag before compressing. This guards against leaks or dampness.
    • Refresh on Arrival: Spritz it with a travel-sized fabric refresher or let it air out once you reach your destination.

    A clean pillow keeps your travel experience pleasant and stress-free.

    Bonus Tips for Pillow Packing Success

    • Double Duty: Use your pillow as a makeshift lumbar support or seat cushion during travel—it’s versatile!
    • Test Run: Practice your compression method at home to avoid surprises at the airport.
    • Size Check: If flying, ensure your packed pillow fits within carry-on limits (usually 22 x 14 x 9 inches for most airlines).
    • Alternative Option: If packing feels too tricky, buy a cheap pillow at your destination and donate it before leaving.

    Common Pillow Packing Mistakes to Avoid

    • Overstuffing: Don’t force a full-sized pillow into a tiny bag—it’ll burst or take up unnecessary space.
    • Skipping Protection: Unprotected pillows can get dirty or damaged—always use a cover.
    • Ignoring Comfort: A poorly chosen pillow might save space but leave you restless. Balance size and support.

    Why This Matters for Your Next Trip

    Packing a pillow for travel isn’t just about logistics—it’s about arriving refreshed and ready to enjoy your journey. Whether you’re dozing off on a red-eye flight or napping during a long layover, a well-packed pillow ensures comfort without clogging up your luggage. By choosing the right pillow, compressing it effectively, and packing it smartly, you’ll master the art of traveling light while staying cozy.

    Next time you’re gearing up for a trip, give these techniques a try. Your neck—and your travel memories—will thank you. Safe travels!

  • How to Pack a Ski Bag for Air Travel: A Comprehensive Guide

    Traveling with ski gear can feel like a logistical puzzle, especially when you’re navigating airline rules, baggage fees, and the need to keep your equipment safe. Knowing how to pack a ski bag for air travel streamlines the process, saves you stress, and ensures your skis, boots, and accessories arrive ready for the slopes. This guide walks you through the steps to pack efficiently, protect your gear, and comply with airline policies—all while optimizing for a smooth journey. Whether you’re a seasoned skier or a first-timer heading to the mountains, these tips will help you hit the ground sliding.

    Step 1: Choose the Right Ski Bag

    Before you start packing, selecting the proper ski bag is crucial. Ski bags come in various types—padded, unpadded, wheeled, or single-pair designs—and your choice depends on your gear and travel needs.

    • Padded vs. Unpadded: Padded bags offer extra protection for skis and poles, ideal if you’re checking them as luggage. Unpadded bags are lighter and more compact but leave your equipment vulnerable to rough handling.
    • Wheeled Bags: If you’re carrying heavy boots or multiple pairs of skis, a wheeled ski bag makes airport navigation easier.
    • Size Matters: Most airlines cap checked baggage at 62 linear inches (length + width + height). Measure your ski bag to avoid oversize fees. A standard bag for one pair of skis is about 72-80 inches long, so check airline policies beforehand.

    For example, a brand like Sportube offers durable, hard-case options, while Dakine’s padded roller bags blend portability and protection. Pick one that fits your skis snugly—too much extra space invites shifting during transit.

    Step 2: Gather Your Ski Gear Essentials

    Packing efficiently starts with knowing what to bring. Beyond skis and poles, consider these must-haves:

    • Skis (one or two pairs, depending on your bag’s capacity)
    • Ski poles
    • Ski boots (optional—some prefer wearing them on the plane)
    • Helmet
    • Goggles
    • Base layers, gloves, and small accessories (if space allows)

    Avoid overpacking. Airlines often charge by weight—typically $30-$50 for a first checked bag, with oversize or overweight fees adding $100 or more. Stick to essentials and distribute heavier items like boots between your ski bag and carry-on if needed.

    Step 3: Prep Your Skis and Poles

    Proper preparation prevents damage and maximizes space. Here’s how:

    • Clean and Dry: Wipe down skis to remove snow, dirt, or moisture. Wet gear can rust bindings or damage bag interiors.
    • Secure Bindings: Adjust bindings to their lowest setting and lock them in place to avoid strain during handling.
    • Tape Poles Together: Use duct tape or Velcro straps to bundle ski poles, keeping them compact and tangle-free.
    • Protect Edges: Wrap ski tips and tails with bubble wrap, foam padding, or even old socks. This shields sharp edges from denting or scratching other gear.

    For twin-tip skis or wider powder skis, ensure your bag accommodates their shape. Standard bags (about 15-20 cm wide) work for most alpine skis, but check dimensions if you’re packing specialty equipment.

    Step 4: Pack Strategically for Protection and Efficiency

    Now, layer your gear thoughtfully:

    1. Start with Skis: Place skis base-to-base (bottoms touching) to protect waxed surfaces. If your bag lacks padding, slide them into a ski sleeve first.
    2. Add Poles: Tuck poles alongside skis, securing them with straps or tape to prevent movement.
    3. Fit Boots: If including ski boots, position them at the bag’s bottom or sides. Wrap them in a plastic bag to keep dirt off other items.
    4. Helmet and Accessories: Nestle your helmet near boots or at the top. Stuff goggles, gloves, or socks inside the helmet to save space and cushion delicate lenses.
    5. Fill Gaps: Use soft items like base layers or a fleece jacket to pad gaps, reducing shifting.

    Pro tip: Place heavier items (boots, helmet) near the bag’s wheels or base for better balance if it’s a roller. Keep weight under 50 lbs to dodge extra fees on most airlines.

    Step 5: Secure and Label Your Bag

    Once packed, ensure everything stays in place:

    • Tighten Straps: Use internal or external compression straps to lock gear down. Loose items shift and risk damage.
    • Lock It Up: Add a TSA-approved lock for security. Ski gear is pricey, and theft isn’t unheard of.
    • Tag Clearly: Attach a luggage tag with your name, phone number, and destination. Include a second tag inside the bag in case the outer one rips off.

    Step 6: Check Airline Policies

    Airlines treat ski bags differently, so review rules before you fly. Key points to verify:

    • Size and Weight Limits: Delta and United, for instance, accept ski bags up to 62 linear inches as standard checked baggage, while oversize fees kick in beyond that.
    • Fees: Many carriers (e.g., Southwest) count a ski bag and boot bag as one item with no extra charge if under weight limits. Others, like American Airlines, may tack on $150 for sports equipment.
    • Snowboard Note: If packing a snowboard instead, the process is similar, but bags are shorter and wider—confirm compatibility.

    Call ahead or check online. Policies shift seasonally, especially during peak ski months like December to March.

    Step 7: Plan for the Airport

    On travel day, ease the process:

    • Arrive Early: Oversized bags often require special check-in at the counter, not kiosks.
    • Wear Boots: If weight’s an issue, wear your ski boots through security—they’re bulky but allowed.
    • Carry Essentials: Keep goggles, gloves, and a neck gaiter in your carry-on in case your ski bag gets delayed.

    Bonus Tips for Stress-Free Ski Travel

    • Insurance: Lost or damaged gear stinks. Check if your homeowner’s policy covers it—or buy travel insurance with sports equipment protection.
    • Rental Option: If packing feels daunting, compare airline fees to renting skis at your destination. Resorts like Vail or Whistler often have high-quality rentals.
    • ** TSA PreCheck**: Speed through security with boots on if you’re wearing them—every minute counts.

    Packing Smart for the Slopes

    Mastering how to pack a ski bag for air travel boils down to preparation, protection, and policy awareness. Choose a bag that fits your gear, pack with care to safeguard skis and boots, and double-check airline rules to avoid surprises. With these steps, you’ll spend less time wrestling baggage and more time carving turns. Ready to fly? Your next powder day awaits—pack up and go chase it.

  • How to Pack a Dakine Ski Bag: A Step-by-Step Guide for Skiers

    Packing for a ski trip can feel overwhelming, especially when you’re trying to fit all your gear into a single bag while keeping it safe and organized. If you’ve invested in a Dakine ski bag—like the popular Dakine Fall Line Ski Roller or Low Roller—you’re already on the right track. These bags are designed for durability, convenience, and ample storage, but knowing how to pack them efficiently can make all the difference. Whether you’re preparing for air travel or a road trip, this guide will walk you through exactly how to pack your Dakine ski bag to maximize space, protect your equipment, and streamline your journey. Let’s dive in and get your gear ready for the slopes.

    Why Proper Packing Matters for Your Dakine Ski Bag

    Before we get into the nitty-gritty, let’s talk about why packing your Dakine ski bag correctly is so important. A well-packed bag ensures your skis, boots, poles, and other essentials stay secure during transit, whether you’re navigating a bustling airport or tossing it into the back of your car. Dakine ski bags, known for their padded compartments and rugged construction, are built to handle the rigors of travel—but they can’t do it all. Improper packing can lead to scratched skis, damaged bindings, or a bag that’s too bulky to manage. Plus, with airline weight limits often hovering around 50 pounds, efficient packing helps you avoid extra fees while fitting everything you need.

    Step 1: Gather Your Gear

    Start by laying out all the items you plan to pack in your Dakine ski bag. This typically includes:

    • Skis
    • Ski boots
    • Poles
    • Outerwear (jacket, pants)
    • Accessories (goggles, gloves, helmet)
    • Optional: base layers, socks, or small tools like a multi-tool or wax kit

    Having everything in front of you helps you visualize how it’ll fit and prevents last-minute scrambling. For this guide, we’ll assume you’re using a Dakine Fall Line Ski Roller or similar model, which can typically hold one or two pairs of skis plus additional gear.

    Step 2: Prepare Your Skis

    Your skis are the backbone of your setup, so they go in first. Here’s how to get them ready:

    • Clean and Dry: Wipe down your skis to remove snow, dirt, or moisture. Wet gear can damage your bag or other items over time.
    • Secure the Brakes: Use ski brake retainers, Velcro straps, or even rubber bands to hold the brakes up. This keeps your skis flat and prevents the bindings from snagging on the bag’s interior or other gear.
    • Base-to-Base Positioning: Place your skis base-to-base (the flat, waxed sides touching). This protects the bases from scratches and creates a stable foundation for layering other items. If you’re packing two pairs, stack them carefully, ensuring bindings don’t overlap or press into each other.

    Lay the skis flat along the bottom of your Dakine ski bag. Most models, like the Fall Line or Low Roller, have a padded interior to cushion them, so align them snugly against one side.

    Step 3: Add Your Ski Boots

    Next up are your ski boots—bulky but essential. Dakine ski bags often feature dedicated boot compartments or enough space to tuck them in strategically. Here’s how to pack them:

    • Stuff Them: Fill your boots with small items like socks, gloves, or a neck gaiter. This saves space and keeps the boots’ shape intact.
    • Positioning: Place your boots near the tail end of your skis, where they’re less likely to shift and damage the topsheets. If your bag has a removable boot compartment (like some Fall Line models), use it. Otherwise, lay them flat on top of the skis or in a corner.
    • Protection Tip: If you’re worried about boots scratching your skis, wrap them in a soft jacket or place a thin layer of clothing between them.

    For air travel, some skiers prefer carrying boots in a separate Dakine boot bag as carry-on luggage. This is a smart move if you’re concerned about lost luggage—renting skis is easier than replacing custom-fitted boots—but if you’re checking everything, they’ll fit fine in your ski bag.

    Step 4: Pack Your Poles

    Ski poles are awkward to pack, but Dakine bags make it manageable. Here’s the trick:

    • Secure Them: Bundle your poles together with a strap or rubber band to keep them from rattling around.
    • Placement: Slide them alongside your skis, ideally in a padded sleeve if your bag has one (common in models like the Fall Line). If not, tuck them between the skis and the bag’s wall to minimize movement.
    • Tip Protection: Wrap the tips in a glove or sock to prevent them from poking through the bag or scratching other gear.

    Step 5: Layer in Clothing and Accessories

    Now that your heavy items are in place, use your clothing to fill gaps and add padding. This is where you can get creative:

    • Outerwear: Lay your ski jacket and pants over the skis to cushion them. Fold them neatly to avoid bulk, or roll them for tighter spaces.
    • Base Layers and Socks: Stuff these into corners or around bindings for extra protection. They’re lightweight and flexible, making them perfect fillers.
    • Helmet and Goggles: If you’re bringing a helmet, nest it near the boots or at one end of the bag. Wrap your goggles in a soft case or cloth and tuck them into a pocket or a safe spot where they won’t get crushed.

    The goal is to create a snug, stable pack where nothing shifts during transit. Dakine ski bags often have external zippered pockets—use these for quick-access items like gloves or a tuning kit.

    Step 6: Check Weight and Secure the Bag

    Most airlines cap checked bags at 50 pounds, so weigh your Dakine ski bag before heading out. A portable luggage scale is a lifesaver here. If you’re over, consider moving lighter items (like base layers) to a carry-on. Once you’re satisfied, zip up the bag fully. Dakine’s heavy-duty zippers are built to last, but double-check they’re closed to avoid spills. If your model has compression straps, tighten them to keep everything compact.

    Bonus Tips for Packing a Dakine Ski Bag

    • Air Travel Hack: Many airlines count a ski bag and boot bag as one checked item—so if you have a separate Dakine boot bag, you might not pay extra. Check your airline’s policy.
    • Padding Bindings: Wrap ski pants or a towel around your bindings to protect them from dings. This is especially key if you’re checking the bag.
    • Road Trip Ready: For car travel, pack looser if you’re not worried about weight. You can even toss in extras like snacks or a small cooler.
    • Gear Maintenance: Slip in a small wax kit or multi-tool for on-the-go fixes—Dakine bags have room for these essentials.

    Why Choose a Dakine Ski Bag?

    Dakine ski bags stand out for their thoughtful design. Models like the Fall Line Ski Roller offer 360-degree padding, oversized wheels for easy rolling, and space for multiple pairs of skis. The Low Roller is a more compact option, perfect for a single pair and lighter gear. Both are waterproof and built to withstand rough handling, making them ideal for skiers who travel often. Compared to competitors like Thule or Douchebags, Dakine strikes a balance between affordability and functionality—perfect for both weekend warriors and powder chasers.

    Common Mistakes to Avoid

    • Overstuffing: Cramming too much in can strain zippers or make the bag unwieldy. Stick to essentials.
    • Loose Skis: Without straps or padding, skis can shift and damage themselves or the bag. Secure them properly.
    • Ignoring Weight Limits: Airlines don’t mess around with overweight fees—keep it under 50 pounds unless your airline allows more.
    • Forgetting Accessibility: Pack items you’ll need mid-trip (like gloves or goggles) in outer pockets, not buried deep.

    Final Thoughts on Packing Your Dakine Ski Bag

    Packing a Dakine ski bag doesn’t have to be a puzzle. Start with your skis, layer in boots and poles, then use clothing to pad and fill the gaps. Weigh it, secure it, and you’re ready to hit the slopes—whether they’re a flight or a drive away. With this method, you’ll protect your gear, save space, and travel with peace of mind. Dakine’s rugged design does half the work; your smart packing does the rest. So, grab your bag, load it up, and get ready for an epic ski adventure. Where are you headed this season? Let us know in the comments—happy skiing!